Friday, May 30, 2008

CHEESECAKE POPS

CHEESECAKE POPS!

Umm, OK, hmmm..I'm trying to think of a good way to put this without being to impetuous. Cheesecake. Pops. Rule. 

There aren't many things I'll eat off a stick but I can easily have these for breakfast, mid morning snack, lunch, mid afternoon snack, dinner, and obviously dessert. These little balls on a stick were lights out. I joined Daring Bakers, an online baking community in which I referenced here, this month and unfortunately was unable to make the challenge of an opera cake. However, I wanted to make up for it by making last month's challenge, cheesecake pops! These were ridiculously fun to make and, although a 2 day process, were fairly easy.  They are a great summer treat to bring to a BBQ and allow for much creativity.  
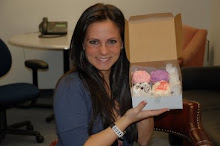
Have you ever had the classic Carvel vanilla soft serve with that awesome chocolate hardshell? Yes? No? Maybe? Well that's what these taste like only with a cheesecake kick! I used cookie cutters to create the shapes of hearts, flowers, balls, and bells. You can be creative and use whatever you'd like- or you can just roll the ball shapes with your hands. Make these!!

Cheesecake Pops

Sticky, Chewy, Messy, Gooey by Jill O’Connor
makes 30–40 pops

5 8-oz pkgs cream cheese, room temperature
2 cups sugar
1/4 cup all-purpose flour
1/4 tsp salt
5 large eggs
2 egg yolks
2 tsps pure vanilla extract
1/4 cup heavy cream

boiling water as needed
thirty-forty 8-inch lollipop sticks

1 lb chocolate, finely chopped
2 tbsp vegetable shortening
assorted decorations: chopped nuts, colored jimmies, crushed peppermints, mini chocolate chips, sanding sugars, coconut, etc etc

Position oven rack in the middle of the oven and preheat to 325 degrees F. Set some water to boil. In a large bowl, beat together the cream cheese, sugar, flour, and salt until smooth. If using a mixer, mix on low speed. Add the whole eggs and the egg yolks, one at a time, beating well (but still at low speed) after each addition. Beat in the vanilla and cream. Grease a 10-inch cake pan (not a springform pan), and pour the batter into the cake pan. Place the pan in a larger roasting pan. Fill the roasting pan with the boiling water until it reaches halfway up the sides of the cake pan. Bake until the cheesecake is firm and slightly golden on top, 35 to 45 minutes. Remove the cheesecake from the water bath and cool to room temperature. Cover the cheesecake with plastic wrap and refrigerate until very cold, at least 3 hours or up to overnight. When the cheesecake is cold and very firm, scoop the cheesecake into 2-ounce balls and place on a parchment paper-lined baking sheet. Carefully insert a lollipop stick into each cheesecake ball. Freeze the cheesecake pops, uncovered, until very hard, at least 1 – 2 hours.

When the cheesecake pops are frozen and ready for dipping, prepare the chocolate. In the top of a double boiler, set over simmering water, or in a heatproof bowl set over a pot of simmering water, heat half the chocolate and half the shortening, stirring often, until chocolate is melted and chocolate and shortening are combined. Stir until completely smooth. Do not heat the chocolate too much or your chocolate will lose it’s shine after it has dried. Save the rest of the chocolate and shortening for later dipping, or use another type of chocolate for variety. Alternately, you can microwave the same amount of chocolate coating pieces on high at 30 second intervals, stirring until smooth.

Quickly dip a frozen cheesecake pop in the melted chocolate, swirling quickly to coat it completely. Shake off any excess into the melted chocolate. If you like, you can now roll the pops quickly in optional decorations. You can also drizzle them with a contrasting color of melted chocolate (dark chocolate drizzled over milk chocolate or white chocolate over dark chocolate, etc.) Place the pop on a clean parchment paper-lined baking sheet to set. Repeat with remaining pops, melting more chocolate and shortening (or confectionary chocolate pieces) as needed.

Refrigerate the pops for up to 24 hours, until ready to serve.


LEMON BARS


THE JUICE IS DEFINITELY WORTH THE SQUEEZE
Let me tell you the first rule about baking desserts using lemon. You have to ask yourself if the juice is worth the squeeze; and in this case, it most certainly is! Lately, I've been making a lot of recipes that involve the rind and juice of a particular fruit (i.e lemon and lime) and I can't stress to you how important it is to make sure you use quality fruits. It's almost pointless and a total waste of time to go through an entire recipe using store bought lemon juice or something of that nature. If you're going to cook/bake using lemon juice, please please please juice the lemons yourself--you'll thank me in the end! Also, if you have Meyer lemons readily available to use, definitely use those--they are the most tart and flavorful. My favorite part about these bars is how mysterious they are. Nothing about these resemble lemon bars and one's taste buds are in for a real surprise! They blow people away.
I mentioned in an earlier post found here, that my mother has been gradually sharing her most sacred recipes with me. These lemon bars, she claims, is the best recipe to date! They were AMAZING! They have a shortbread crust with a pecan pie type of filling (think brown sugar gooeyness) that contains both pecans and coconut with a lemon drizzle on top. I made a few mistakes that I actually think worked in my favor. First off, I doubled the coconut by accident because I was distracted. I'm a huge coconut lover so this mistake clearly didn't bother me! My other mistake was that I put the lemon-sugar drizzle on top before I baked the bars leaving a lemony crunchy crust atop. Again, I loved how they came out! Next time I will put the glaze on after they are baked and have it drizzle down the sides. This recipes uses the rind of 5 lemons...yes, you read that correctly, 5 lemons! They were so tart and delicious! My boss is a huge lemon-dessert fan and he rated these top 3 greatest desserts I've made thus far! Unfortunately, again, I cannot expose this recipe to the public because my mother just might have me killed. I feel like such a tease! She made me swear before giving me the recipe that I wouldn't post it! I promise I'll go back to posting recipes that can be revealed! 

Wednesday, May 28, 2008

DARING BAKERS

DARING BAKERS
OK, I'm spiraling out of control with all of these online interactive baking clubs. I have officially joined another one, called Daring Bakers, in addition to Tuesday's With Dorie. They are just so much fun and really encourage/challenge/give me the opportunity to bake recipes I'd never normally make. Lots of these recipes I never even knew existed! Each recipe I make bestows more confidence, leaving me with this overwhelming anticipatory feeling leading up to each new recipe reveal.  Daring Baker's is different from Tuesday's With Dorie in that a recipe is revealed at the end of each month and you have 1 whole month to complete it. All the Daring Baker members post on the same date at the end of the month. I love being able to compare and contrast various creativity levels with the others. The recipes are all pretty challenging or, ah-hem, daring. Sooooo, I joined this group in the beginning of May and was unable to complete this month's challenge because I just ran out of time. The challenge was to make an Opera cake which is a 7 layer cake consisting of jaconde, buttercream, ganache, and glaze or mousse. Nothin' like leaving everything until the last minute, eh? This challenge is extremely involved and due to the lack of time, I fell short of this month's challenge. However, I decided to make April's challenge (Cheesecake Pops) to make up for my Opera cake absence; post to follow! Click here to see all the other fabulous Daring Baker's Opera cakes and past challenges!


Tuesday, May 27, 2008

PEANUT BUTTER CUPS

HOME-MADE PEANUT BUTTER CUPS
Reese's is one of my all time favorite chocolate candy, hands down. Actually, it's not one of my all time faves, it is my all time favorite. I could eat Reese's for breakfast, lunch and dinner-no questions asked. With that said, I thought it would be fun to make my own Reese's. These were super fun and easy to make. I got the recipe from My Kitchen Cafe, which is a tremendously fabulous food blog for all you bloggers out there. This entire process took about 20 minutes and they tasted exactly like Reese's PB cups!! I put these in cute candy boxes with pretty tissue paper and elastic gold bows and they looked straight out of the Reese's factory! Try these :)

Solid Peanut Butter Cups 
12 ounces melted chocolate (I used 9 ounces semi-sweet squares and 3 ounces white chocolate squares)
1 cup creamy peanut butter
1/2 cup confectioner's sugar
1/2 teaspoon vanilla

Melt chocolate according to package directions, taking care not to overheat. I melted the semisweet and white chocolate separately and then mixed together. To melted chocolate add peanut butter, sugar and vanilla. Mix well. Spoon or pipe (I used a decorating bag with a large round tip) chocolate mixture into small baking cups. Refrigerate until set. Enjoy!

BROWNIE CHEESECAKE


HOW 'BOUT SOME BROWNIE WITH THAT CHEESECAKE?
My mother had a catering business for quite some time several years ago in which she kept all her "sacred" recipes in this little worn 4 by 6 red book that didn't leave her sight, ever.  This book is filled with unbelievable recipes, most of which she created,  that she has been using for years and is constantly adding to. When my love for baking began, my mother slowly, one by one, shared some of these recipes with me. Please note that she will not give me the book to follow the recipes; she will only photocopy the recipe for me because god forbid I lost or even stained the book she'd disown me.  
I knew I would be attending a few BBQ's this past weekend for Memorial Day and decided to make her Brownie Cheesecake recipe. When I scrolled down to the bottom and saw "serve frozen" I knew it would be the perfect treat for an outdoor BBQ in blazing heat. Well, it was just that...perfect! First, I made the brownie layer which ultimately becomes the foundation for this wondrous cube of greatness. Atop the brownie comes the cream cheese "filling" then capped off with chocolate ganache. Once cooled and ready to be cut up, I was totally floored when I saw how these came out. Before I put the pan in the oven, the brownie batter was pretty much equal to the cream cheese filling, however, once baked, the brownie layer became thin while the cream cheese layer expanded and set-making these bars 90% cheesecake 10% chocolate. These were so awesome! Serving them frozen was the absolute way to go and they were a hit at the BBQ! Unfortunately, I cannot reveal this recipe, as mentioned earlier, my mother will disown me. Enjoy the pictures!

NO TWD

NO TWD THIS WEEK:BOOOOO
Sorry folks, but there won't be a TWD (Tuesday's With Dorie)  posting this week.  I quickly scanned the recipe yesterday thinking I could attempt to complete it, but I realized it's a 2 day process which seemed overly involved for me. I lacked both the time and the patience for the Pecan Honey stick buns chosen by Madam Chow,  however, they do look delicious! You can find these sticky buns baked by other fellow TWD'ers here. I will be back in action next Tuesday for Dorie's French Chocolate Brownies! Mmmmm..

Friday, May 23, 2008

CASHEW BARS

SWEET-N-SALTY BUTTERSCOTCH CASHEW BARS
I LOVE cashews. Bottom line, they are my most favorite nut of all the nuts in the land!! I'm a total cashew freak. I keep salted cashews in my freezer at all times--they are so good super cold!  When I saw this recipe on Bake or Break, I knew right away that I had to make them and they completely satisfy the requirements of my new finger food kick that I'm on. These contain the most perfect compliment of saltiness and sweetness-a combination that can't be beat. The crust is that of a very crunchy shortbread-type crust, topped with caramelized butterscotch and big salted cashews.  These are very easy to make and require a very strong arm for cutting so make sure you save some energy for this portion! 
Again, I can't reiterate enough how delicious these are. The crust is super super crunchy and thick and the caramelized butterscotch is so sticky and sweet. If you like nuts half as much as me, you will go gaga for this recipe. 
  • INGREDIENTS:
  • 1/2 pound (2 sticks) butter
  • 1 cup firmly packed light brown sugar
  • 1 & 1/4 teaspoons kosher salt
  • 2 & 1/2 cups all-purpose flour
  • 11 ounces butterscotch chips
  • 3/4 cup light corn syrup
  • 1 tablespoon plus 1 teaspoon water
  • 2 cups roasted salted whole cashews


Preheat oven to 350°. Spray a 9″x 13″ pan with cooking spray. Using two sheets of parchment paper, line the pan’s width and length, creating a parchment “sling.” Spray parchment paper with cooking spray.

Using an electric mixer on medium speed, beat butter, brown sugar, and salt for 1 to 1 & 1/2 minutes. Decrease mixer speed to low and add the flour. Mix just until combined. Lightly press dough evenly into the prepared pan. Poke holes in the dough with a fork. Bake for 30 to 40 minutes, until the crust is a golden color. Remove to wire rack to cool.

In a heavy saucepan over low heat, stir together butterscotch chips, corn syrup, and water. Stir until mixture comes to a simmer and butterscotch chips are melted. Pour over crust.

Sprinkle cashews over the butterscotch caramel. Bake for 5 minutes. Cool completely on a wire rack. After cooling, remove from pan and use a very sharp knife to cut into bars.

Makes 2 dozen 2-inch bars.


COOKIES

SWIRL CHIP COOKIES
There is something about cold, gloomy, ominous days that throw me into a crazy baking rage. I'm unstoppable on these types of days. Well, yesterday was just that kind of day. I go in stages with various sorts of baked goods. The last few months I was really into cakes, specifically layer cakes. I enjoy being creative with the actual construction and decoration of a layer cake. However, the flavor of this month are finger food type treats, such as cookies, brownies, bars, etc. Anything bite sized that doesn't require utensils is categorized as a finger food in my book. 
Anyway, these cookies are one of the few finger food recipes I made yesterday (more posts to follow). I'm always searching for that perfect, simple, chewy, yet crispy, chocolate chip cookie.  I can easily pull up 1 zillion chocolate chip cookie recipes online so that's where my research began. I perused several recipes starting with the ingredients section which I knew would ultimately be the selling point for making that particular cookie. The recipe I decided to use was a great choice! These cookies satisfied my every desire in a chocolate chip cookie; chewy on the inside and crunchy on the outside--score! I made these into mini sized cookies amounting to about 6 dozen!! For the chips, I used Nestle's swirl chips (chocolate/white chocolate) as well as regular semi sweet. I'm a total chip whore. Peanut butter chips, white chocolate chips, bittersweet chips, semi sweet chips, butterscotch chips, etc etc. I even add chips to recipes that don't even call for it. You can make these cookies 100 different ways by substituting different kinds of chips. You can even add coconut, nuts, raisins, etc. Have fun with it! Be creative! These are the perfect finger food treat! Utterly delicious....


Thick and Chewy Chocolate Chip Cookies
Adapted from Cook's Illustrated

2 1/8 c Flour 
1/2 t table salt
1/2 t baking soda
12 T unsalted butter, melted and cooled slightly (I don't use unsalted butter because I never buy it - salted butter works just fine in this recipe when I use it!)
1 c brown sugar 
1/2 c sugar 
1 large egg
1 large egg yolk
2 t vanilla
1-2 c chocolate chips (I used an entire 11oz bag of Nestle swirled chips as well as 1/2 c. of Nestle Semi-Sweet chips)

Heat oven to 325 degrees. Adjust oven racks to upper- and lower-middle positions. Mix flour, salt, and baking soda together in medium bowl; set aside.

Either by hand or with electric mixer, mix butter and sugars until thoroughly blended. Mix in egg, yolk, and vanilla. Add dry ingredients; mix until just combined. Stir in chips.

Form dough into balls using a spoon and place on cookie sheets (I lined with parchment paper). I formed little dough balls to create mini sized cookies, so use your judgement based on how big you want your cookies to be.

Bake, reversing cookie sheets’ positions halfway through baking, until cookies are light golden brown and outer edges start to harden yet centers are still soft and puffy, 15 to 18 minutes (As you know, everyone's oven is different. I baked my mini's for about 11-12 minutes and they came out perfectly). Cool cookies on cookie sheets. Serve or store in airtight container.

Monday, May 19, 2008

CARROT CAKE

TUESDAY'S WITH DORIE: 
BILL'S BIG CARROT CAKE
I realize today is Monday but I just couldn't wait until tomorrow to post. Plus, I'm not sure how much time I'll have tomorrow to do so, so here it is....(insert drum roll here)....Bill's Big Carrot Cake!! This week's entry for Tuesday's With Dorie was chosen by Tara of Smells Like Home and she chose Traditional Madeleines. However, because Madeleines require a certain type of pan (which I do not own), Laurie (who runs the group) suggested those who do not own the pan can make an alternative recipe from Dorie's book; as long as the recipe has already been used for the weekly entries. I knew right away that I wanted to make this carrot cake. I joined 1 week too late to participate in this carrot cake's entry week so I figured I would make up for it this week, as long as I had the opportunity to choose among several already baked recipes. This was my first carrot cake. I've never even baked anything involving a vegetable.  Well, let me just say that this cake was off the charts, hands down, out of this world, unbelievable. 
I've always loved carrot cake. I think my love for carrot cake began when I was 13 and my mother insisted upon making my Bat-Mitzvah cake a carrot cake. It was an enormous sheet cake with gorgeous marzipan decorations throughout with silky,buttery cream cheese frosting. After that, carrot cake was always my first choice.  Rather than making this cake in 3-9 inch round pans (which is what the recipe called for), I opted for 3-6inch rounds and 1 standard size cupcake tin (12). I only ended up using two of the 6inch rounds and sliced each one in half, creating 4 layers. I frosted the middles, sides, and top,  piped orange colored shells around the top and bottom, and using decorating tip #3, designed a carrot on top. If you were wondering what I did with the 3rd cake round, I wrapped it up and froze it for the future.
 
I swirled the cream cheese frosting on the cupcakes and topped it off with yellow sugar crystals. If I haven't yet made it clear enough, I LOVE THIS RECIPE! These flew off my desk at work at an exponential rate as the day went on. 

Bill's Big Carrot Cake
Adapted from: Baking: From My Home To Yours


For the cake:
1 1/2 cups all purpose flour
1/2 cup almond flour
2 teaspoons baking powder
2 teaspoons baking soda
2 teaspoons ground cinnamon
¾ teaspoon salt
3 cups grated carrots (about 9 carrots, you can grate them in food processor fitted w/ a shredding a blade or use a box grater)
1 cup shredded coconut (sweetened or unsweetened)
½ cup moist, plump golden raisins
2 cups sugar
1 cup canola oil
4 large eggs

Getting ready:
Position the racks to divide the oven into thirds and preheat the oven to 325 degrees Fahrenheit. Butter three 9-x-2-inch round cake pans, flour the insides, and tap out the excess. Put the two pans on one baking sheet and one on another.
 
To make the cake:
Whisk the flours, baking powder, baking soda, cinnamon and salt. In another bowl, stir together the carrots, chopped nuts, coconut, and raisins.
Working with a stand mixer, preferably fitted with a paddle attachment, or with a hand mixer in a large bowl, beat the sugar and oil together on a medium speed until smooth. Add the eggs one by one and continue to beat until the batter is even smoother. Reduce the speed to low and add the flour mixture, mixing only until the dry ingredients disappear. Gently mix the chunky ingredients. Divide the batter among the baking pans.
Bake for 40-50 minutes, rotating the pans from top to bottom and front to back at the midway point, until a thin knife inserted into the centers comes out clean. The cakes will have just started to come away from the sides of the pans. Transfer the cakes to cooling racks and cool for about 5 minutes, then run a knife around the sides of the cakes and unmold them. Invert and cool to room temperature right side up.
The cakes can be wrapped airtight and kept at room temperature overnight or frozen for up to 2 months.


BLONDIES

CHEWY CHUNKY BLONDIES
Here's a shocking development for you folks....I made yet ANOTHER recipe from Dorie Greenspan's book, "Baking: From My Home To Yours". If this blog and it's respective detailed pictures do not heavily encourage you to buy this book then I really don't know what will.  Let me reiterate, BUY THIS BOOK! OK, enough of a sales pitch outta me. Oddly enough this is my first batch of blondies, ever. I've baked several different types of chocolate brownies, but never blondies; which is why this recipe caught my eye. As I skimmed the ingredients portion of this page, my eyes immediately locked in on heath bar bits. It was that moment that I decided to make these; love at first sight. 
These blondies were loaded; coconut, heath bar, chocolate chunks, and walnuts. I loved the addition of the coconut as it really gave these squares a sticky consistency while also having the crunch from the heath bar, chocolate chunks, and walnuts. I will definitely be making these again; perhaps interchanging white chocolate chunks and/or Butterfingers. You can also substitute the walnuts for a different kind of nut that suits your palette. The brown sugar and heath bar combination are so tasty. When I took these out of the 9X13 inch pan and before cutting them up into squares, I went around the entire perimeter with a knife and thinly sliced off the ends. I noshed on these as I finished up and they were the best part! They are very chewy and satisfying. I bagged up the ends and put them in my freezer for a rainy day.

Chewy, Chunky Blondies 
adapted from Dorie Greenspan's 
Baking: From My Home to Yours

INGREDIENTS:
2 cups all-purpose flour
3/4 teaspoon baking powder
1/2 teaspoon baking soda
1/2 teaspoon salt
2 sticks (8 ounces) unsalted butter, at room temperature
1 1/2 cups (packed) light brown sugar
1/2 cup sugar
2 large eggs
1 teaspoon vanilla extract
6 ounces bittersweet or semisweet chocolate, chopped into chips, or 1 cup store-bought chocolate chips 

1 cup butterscotch chips or Heath toffee bits 

1 cup coarsely chopped walnuts 

1 cup sweetened shredded coconut 


Getting ready: Center a rack in the oven and preheat the oven to 325 degrees F. Butter a 9x13-inch baking pan 
and put it on a baking sheet.

Whisk together the flour, baking powder, baking soda, and salt.

Working with a stand mixer, preferably fitted with a paddle attachment, or with a hand mixer in a large bowl, beat the butter on medium speed until smooth and creamy. Add both sugars and beat for another 3 minutes, or until well incorporated. Add the eggs one by one, beating for 1 minute after each addition, then beat in the vanilla. Reduce the mixer speed to low and add the dry ingredients, mixing just until they disappear into the batter. Using a rubber spatula, stir in the chips, nuts, and coconut. Scrape the batter into the prepared pan and use the spatula to even the top as best as you can.

Bake for about 40 minutes 
(mine took about 35 minutes), or until a knife inserted into the center of the blondies comes out clean. The blondies should pull away from the sides of the pan a little and the top should be a nice honey brown. Transfer the pan to a rack and cool for about 15 minutes before turning the blondies out onto another rack. Invert onto a rack and cool the blondies to room temperature right side up.

Cut into 32 bars, each roughly 2 1/4 x 1 1/2 inches.


Friday, May 16, 2008

PERFECT PARTY CAKE

PERFECT PARTY CAKE FOR A PERFECT BIRTHDAY GIRL
One of my closest, dearest, oldest friends is celebrating her birthday today! Let me take a moment to wish her a Happy Birthday J!!!!!!!! In celebration of her 26th birthday, of course, I baked her a birthday cake. I am so enamored by Dorie Greenspans, "Baking: From My Home To Yours" (I mention this book in most of my posts) that I decided to make Dorie's "perfect party cake". This is a recipe I've been wanting to try for quite some time and I know J will love it. It's, er, um, perfect. I have yet to make a cake like this one.
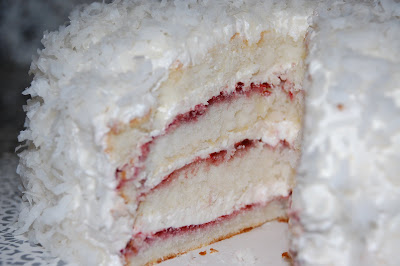
Whenever I think of birthday cake a yellow cake with loads and loads of vanilla and/or chocolate frosting (from the can) with some sort of sprinkles comes to mind. Don't get me wrong, birthday cake like that is absolutely delicious and makes me feel like a kid again but this "perfect party cake" is in another league. This "perfect party cake" takes the cake, no pun intended. It is a more sophisticated classy kind of birthday cake suitable for the elderly; and by elderly, I mean 21+(or something).  Anyway, this cake has very interesting twists to it. The actual cake is very light and fluffy with various intimations of lemon while the filling consists of the silkiest, smoothest lemon buttercream atop red raspberry preserves.  The entire cake is then doused in buttercream and topped off with sweetened coconut. Seriously, this was awesome and so divergent. It was a pretty big project to take on  but it was well worth it. 
Sorry J, but I had to cut a slice so that I could take a picture and post! OK, OK, maybe I had other incentive to cut it at 11:30pm last night (think: taste test). HAPPY BIRTHDAY XOXO

The Perfect Party Cake
from Dorie Greenspan

For the Cake:
2 ½ cups cake flour
1 tablespoon baking powder
½ teaspoon salt
1 ¼ cups buttermilk
4 large egg whites
1 ½ cups sugar
2 teaspoons grated lemon zest
1 stick (8 tablespoons or 4 ounces) unsalted butter, at room temperature
½ teaspoon pure lemon extract

For the Buttercream:
1 cup sugar
4 large egg whites
3 sticks (12 ounces) unsalted butter, at room temperature
¼ cup fresh lemon juice (from 2 large lemons)
1 teaspoon pure vanilla extract

For Finishing:
2/3 cup fig preserves
About 1 ½ cups crushed walnuts

Getting Ready
Centre a rack in the oven and preheat the oven to 350 degrees F. Butter two 9 x 2 inch round cake pans and line the bottom of each pan with a round of buttered parchment or wax paper. Put the pans on a baking sheet.

To Make the Cake:
Sift together the flour, baking powder and salt. Whisk together the milk and egg whites in a medium bowl. Put the sugar and lemon zest in a mixer bowl or another large bowl and rub them together with your fingers until the sugar is moist and fragrant. Add the butter and working with the paddle or whisk attachment, or with a hand mixer, beat at medium speed for a full 3 minutes, until the butter and sugar are very light. Beat in the extract, then add one third of the flour mixture, still beating on medium speed. Beat in half of the milk-egg mixture, then beat in half of the remaining dry ingredients until incorporated. Add the rest of the milk and eggs beating until the batter is homogeneous, then add the last of the dry ingredients. Finally, give the batter a good 2- minute beating to ensure that it is thoroughly mixed and well aerated. Divide the batter between the two pans and smooth the tops with a rubber spatula. Bake for 30-35 minutes, or until the cakes are well risen and springy to the touch – a thin knife inserted into the centers should come out clean. Transfer the cakes to cooling racks and cool for about 5 minutes, then run a knife around the sides of the cakes, unfold them and peel off the paper liners. Invert and cool to room temperature, right side up (the cooled cake layers can be wrapped airtight and stored at room temperature overnight or frozen for up to two months).

To Make the Buttercream:
Put the sugar and egg whites in a mixer bowl or another large heatproof bowl, fit the bowl over a plan of simmering water and whisk constantly, keeping the mixture over the heat, until it feels hot to the touch, about 3 minutes. The sugar should be dissolved, and the mixture will look like shiny marshmallow cream. Remove the bowl from the heat. Working with the whisk attachment or with a hand mixer, beat the meringue on medium speed until it is cool, about 5 minutes. Switch to the paddle attachment if you have one, and add the butter a stick at a time, beating until smooth. Once all the butter is in, beat in the buttercream on medium-high speed until it is thick and very smooth, 6-10 minutes. During this time the buttercream may curdle or separate – just keep beating and it will come together again. On medium speed, gradually beat in the lemon juice, waiting until each addition is absorbed before adding more, and then the vanilla. You should have a shiny smooth, velvety, pristine white buttercream. Press a piece of plastic against the surface of the buttercream and set aside briefly.

To Assemble the Cake:
Using a sharp serrated knife and a gentle sawing motion, slice each layer horizontally in half. Put one layer cut side up on a cardboard cake round or a cake plate protected by strips of wax or parchment paper. Spread it with one third of the preserves. Cover the jam evenly with about one quarter of the buttercream. Top with another layer, spread with preserves and buttercream and then do the same with a third layer (you’ll have used all the jam and have buttercream leftover). Place the last layer cut side down on top of the cake and use the remaining buttercream to frost the sides and top. Press the coconut into the frosting, patting it gently all over the sides and top.

Wednesday, May 14, 2008

PEANUT BUTTER CHOCOLATE MUFFINS

PEANUT BUTTER CHOCOLATE MUFFIN MOUNDS
Peanut butter. Chocolate. Muffins. Oh how I love to tag the word "muffins" to the end of this recipe thus allowing for an appropriate breakfast food. The moment you add the word muffin to any chocolatey recipe it automatically holds connotations of breakfast and early morning food, making chocolate OK forenoon.  That notion works for me. I grabbed this recipe from Bake or Break and it is originally adapted from Nestle's Very Best Baking. The batter is your typical chocolate muffin/brownie batter put into muffin tins, filled with warm peanut butter, then topped off with peanut butter and chocolate chips. In addition, peanut butter and chocolate chips are mixed throughout the batter making for a chocolate peanut butter overload explosion.  
Once the batter is put into the tins, baked, and taken out of the oven, the center of the muffin collapses upon cooling. Once this happens, a large dollop of warm peanut butter is inserted into the centers followed by a sprinkling of peanut butter and chocolate chips. This recipe yields 12 regular sized muffins, however, I made 6 large (not jumbo) muffins and they came out delicious. Next time I think I will stick to the regular size muffin tin as I had to cut my large muffins in half to serve because they were very rich. Regular size, or even mini muffin size would be more suitable, especially for a breakfast treat! These were so simple to make and if you enjoy a crunchy crust with a gooey soft inside then I highly suggest you make these!
  • INGREDIENTS:
  • 3/4 cup granulated sugar
  • 1/4 cup unsalted butter, softened
  • 1 tablespoon water
  • 3/4 cup semi-sweet chocolate chips
  • 1 large egg
  • 1/2 teaspoon vanilla extract
  • 1 cup all-purpose flour
  • 1/4 teaspoon baking soda
  • 1/2 cup peanut butter chips plus about 1/3 cup more for garnishing
  • 1/2 cup semi-sweet chocolate chips plus about 1/3 cup more for garnishing
  • 3/4 cup creamy peanut butter

Preheat oven to 350°. Spray or grease 12 muffin cups.

In a large microwave-safe bowl, combine sugar, butter, and water. Microwave on high for 1 minute or until butter is melted. Stir in 3/4 cup semi-sweet chocolate chips until melted. Stir in egg and vanilla extract. Add flour and baking soda, stirring until blended. Allow to cool to room temperature. Then, stir in 1/2 cup each peanut butter chips and semi-sweet chocolate chips. Spoon batter by heaping tablespoonfuls into muffin cups.

Bake for 13-15 minutes or until top is set and a toothpick inserted into the center comes out slightly wet. Place pan on wire rack. Centers of brownies will fall upon cooling. If not, tap centers with the back of a teaspoon to make a hole.

Place peanut butter in a small microwave-safe bowl. Microwave on high for 45 seconds, then stir. While brownies are still hot, spoon about a tablespoon of peanut butter into the center of each brownie. Top with semi-sweet chocolate chips and peanut butter chips. Cool completely in pan.

Tuesday, May 13, 2008

FLORIDA PIE

TUESDAY'S WITH DORIE:
 FLORIDA PIE
Well, it's Tuesday and that means it's my day to post for Tuesdays With Dorie. This week's recipe was chosen by Dianne of Dianne's Dishes and she chose Florida Pie. Let me just say how excited I was when I saw this selection. I've felt compelled to make a Key Lime (or in this case, Key Lime-ish pie combining lime and coconut) for quite some time and now I had the perfect excuse. I knew I would be going home last Sunday for Mother's Day and my father's absolute FAVORITE dessert would have to be Key Lime pie, no doubt about it. I knew he would be the perfect taste tester considering he's such a Key Lime pie connoisseur and that I'd embrace his criticism with open arms.

This recipe was very interesting. Picture a Key Lime Pie with a coconut twist. The bottom layer is your traditional graham cracker crust, which I pretty much doubled because I like it thick and up the sides of the pie plate. Then comes the coconut layer. This was made by simmering shredded sweetened coconut, sugar, and heavy cream in a sauce pan until it thickens; creating a coconut cream. The 3rd layer consists of key lime juice, sweetened condensed milk, and egg yolks. I went to several places in Manhattan to find a good quality Key Lime juice. I found 
Nellie & Joe's Famous Key West Lime Juice at Citarella's, a great gourmet market. I bought 3 bottles! I did make one alteration to the recipe. I really didn't have to time to make/perfect a meringue topping (this could be a difficult task), so I made my own whipped cream using heavy cream and confectioners. I garnished the pie with toasted coconut and sliced limes. It was fantastic. My father LOVED it. This pie had a tart and sweet taste from the creamed coconut and it cools/holds its shape very nicely in either the freezer or the fridge. I really wanted to get creative with this recipe but unfortunately I lacked the time. Originally I had planned to make this pie in 4-6inch round pans but only 2 of the 4 pans were spring form and I thought it would be difficult to get the pie out of the non spring form pans without destroying it. Next time I make this I'm going to make them in cupcake tins and present them as Florida Pie cupcakes. This pie is hands down one of the best I've tasted. Next week: Traditional Madeleines. Stay tuned...
FLORIDA PIE
1 9-inch graham cracker crust fully baked and cooled, or a store-bought crust
1 1/3 cups heavy cream
1 1/2 cups shredded sweetened coconut
4 large eggs, separated
1 14-ounce can sweetened condensed milk
1/2 cup fresh Key (or regular) lime juice (from about 5 regular limes)
1/4 cup of sugar

Getting Ready:
Center a rack in the oven and preheat the oven to 350 degrees F. Put the pie plate on a baking sheet lined with parchment of a silicone mat.
Put the cream and 1 cup of the coconut in a small saucepan and bring it to a boil over medium-low heat, stirring almost constantly. Continue to cook and stir until the cream is reduced by half and the mixture is slightly thickened. Scrape the coconut cream into a bowl and set it aside while you prepare the lime filling.
Working with a stand mixer, preferably fitted with a paddle attachment, or with a hand mixer in a large bowl beat the egg yolks at high speed until thick and pale. Reduce the mixer speed to low and beat in the condensed milk. Still on low, add half of the lime juice. When it is incorporated, add the reaming juice, again mixing until it is blended. Spread the coconut cream in the bottom of the graham cracker crust, and pour over the lime filling.
Bake the pie for 12 minutes. Transfer the pie to a cooling rack and cool for 15 minutes, then freeze the pie for at least 1 hour.

To Finish the Pie with Meringue: *see below for the whipped cream substitute*
Put the 4 egg whites and the sugar in a medium heavy-bottomed saucepan and heat over medium-low heat, whisking all the while, until the whites are hot to the touch. Transfer the whites to a stand mixer, fitted with the whisk attachment, or use a hand mixer in a large bowl, and beat the whites at high speed until they reach room temperature and hold firm peaks. Using a rubber spatula, fold the remaining 1/2 cup coconut into the meringue.
Spread the meringue over the top of the pie, and run the pie under the broiler until the top of the meringue is golden brown. (Or, if you've got a blowtorch, you can use it to brown the meringue.) Return the pie to the freezer for another 30 minutes or for up to 3 hours before serving.


*Whipped Cream*
1 1/2 C. heavy whipping cream
1/3 C. confectioners sugar
1 Tsp. vanilla

Whip the cream with the confectioner's sugar and vanilla and spread on top of pie.

Monday, May 12, 2008

CHIPSTERS

SO YOU'RE SAYING IT'S A COOKIE, ON TOP OF A BROWNIE?
TRUE STORY, FOLKS.
I was up early on Saturday and got a lot of my errands and the gym done before noon, which, by the way, is an extreme rarity for me considering I don't open my eyes until at least noon on a weekend--and by at least, I mean more like 2pm.  Yes, I heart sleep. Since I got the puppies, however, I have been up super early so I'm able to get up and get out at a decent time leaving me lots of free time in the late afternoons to experiment and bake.  On Saturday, I baked my Tuesday's With Dorie entry for this week which involved lots of freezer time so I thought I'd make something while I waited for my pie to set.  I figured since I already had Dorie Greenspan's book ("Baking: From My Home To Yours") open on my countertop I would look through the "Cache of Cookies" section.  As I flipped through, I came across Chipsters, as pictured above and below. Basically this recipe consists of brownie batter topped off with chocolate chip cookie dough batter. It doesn't get any more simple than that. I'm not sure why they are called Chipsters as I feel that perhaps "brookies" would be more appropriate. Brownie+Cookie=Brookie..?! Any takers? Anyway, these were nothing special although still very tasty.  The cookie layer on top thickens while baking creating a great rich cookie crust. I would have preferred the brownie layer to have been less dense/dry and more cake-ier but there was so much chocolate throughout that it kind of made up for it. I even added chocolate chips to the top. I would also most definitely pair these bad boys up with vanilla ice cream next time.

Chipster-Topped Brownies
From: Baking: From My Home to Yours, by Dorie Greenspan

For the brownie layer:
6 ounces bittersweet chocolate, coarsely chopped
3 ounces unsweetened chocolate, coarsely chopped
2 sticks (8 ounces) unsalted butter, cut into chunks
1 2/3 cups sugar
4 large eggs
½ teaspoon salt
½ teaspoon pure vanilla extract
1 cup all-purpose flour
1 cup walnuts, coarsely chopped

For the cookie layer:
1 ¼ cups all-purpose flour
½ teaspoon baking soda
½ teaspoon salt
1 ½ sticks (12 tablespoons) unsalted butter, at room temperature
¾ cup (packed) light brown sugar
2/3 cup sugar
1 large egg
1 egg yolk
1 teaspoon pure vanilla extract
6 ounces bittersweet chocolate, chopped into chips, or 1 cup store-bought chocolate chips
*I sprinkled an extra cup of chocolate chips on top of the cookie layer*

Getting ready: Center a rack in the oven and preheat the oven to 350 degrees F. Butter a 9-x-13-inch baking pan, line it with wax or parchment paper and butter the paper. Put the pan on a baking sheet.

To make the brownie batter: Put both chocolates and the butter in a bowl set over a saucepan of simmering water. Stirring occasionally, heat just until the ingredients are melted, shiny and smooth. If the mixture gets too hot, the butter will separate from the chocolates. Remove the bowl from the heat.

Working with a stand mixer, preferably fitted with a paddle attachment, or with a hand mixer in a large bowl, beat the sugar and eggs on medium-high speed for about 2 minutes, until pale, thick and creamy. Beat in the salt and vanilla extract. Reduce the speed to low and mix in the melted chocolate and butter, mixing only until incorporated. Scrape down the sides of the bowl with a rubber spatula, then, still on low speed, add the flour, mixing only until it disappears into the batter. Using the spatula, fold in the walnuts, and scrape the batter into the prepared pan. Set aside.

To make the cookie dough: Whisk together the flour, baking soda, and salt.

Working with a stand mixer in the cleaned bowl or with the hand mixer in another large bowl, beat the butter and both sugars together on medium-high speed until smooth and creamy, about 3 minutes. One at a time, add the egg and the yolk, beating for 1 minute after each addition. Beat in the vanilla. Reduce the mixer speed to low and add the dry ingredients, mixing only until they disappear into the dough. Still on low, mix in the chopped chocolate. Drop the cookie dough by spoonfuls over the brownie batter an, using a spatula and a light touch, spread it evenly over the batter.

Bake for 50 to 55 minutes, or until the cookie top is deep golden brown and firm and a thin knife inserted into the brownie layer comes out with only faint streaks of moist chocolate. Transfer the pan to a rack and cool to room temperature.

When the brownies are completely cool, carefully run a knife between the sides of the pan and the brownies, then invert them onto another rack, remove the paper and turn right side up onto a cutting board. Cut into bars about 2 inches by 1 inch. (You can cut larger bars if you’re serving to cookie lovers with Texas-size appetites.)