Friday, May 9, 2008

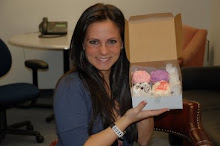
BANANA CUPCAKES

BONKERS FOR BANANA BREAD
OK, I've officially fallen off my rocker. I am so obsessed with the banana bread that I made last week, found here, that I absolutely had to make it again. My poor excuse: "I have several bananas that aren't going to be eaten and are at optimal ripeness for banana bread." Weak, I know. Anyway, moving on...Sooooooo, I decided to switch it up a little bit and make this baking venture a tad more interesting. I made the exact same batter as last week with only one exception; the amounts of mini chocolate chips that were packed into this batter was complete and utter insanity. I must have used 1 1/2 bags, as I didn't even measure because I was in crazy chip-happy mode. Rather than making loaves or using 9 inch round pans like last week, I decided to create mini muffins, medium sized muffins, and a bundt cake. Yes, I realize that seems like a whole lot, however, this recipe is HUGE and made enough for 12 mini muffins, 6 medium to large muffins, and filled an entire bundt pan.  
I also did not use the White Chocolate cream cheese icing. Instead, I created my own frosting which came out so creamy and delicious.  It had a kick to it, as it consisted of nutmeg and honey, and it was the perfect compliment to the muffins.
 
Honey Butter Cream Cheese Frosting:
1/2 cup of butter, softened
3 Tablespoons of Honey
1/2 Teaspoon Cinnamon
1/4 Teaspoon Nutmeg+ a little extra pinch
1/4 Teaspoon Vanilla Extract
8 oz Cream Cheese, softened *next time I may knock it down to 6oz*
2 Cups Confectioners Sugar *Add more or less depending on the type of consistency you're looking for*
1-3 Tablespoons Milk (optional) *also depends on consistency you're looking for*
Mix butter, honey, cinnamon, nutmeg and vanilla until well blended and smooth. Add cream cheese and beat until smooth. Gradually add confectioner's sugar and beat until smooth and creamy. If you are looking for a looser type of frosting then add milk.                                                          
This banana bread is like a five tool player in baseball;while it doesn't excel in hitting for average, hitting for power, base running skills, throwing and fielding ability, it does, however, excel in taste, versatility, reliability ,consistency, and simplicity. I dare you to try it...




Wednesday, May 7, 2008

CHOCOLATE COVERED BLUEBERRIES

CHOCOLATE COVERED BLUEBERRIES
My mom came over last night to see her newborn grandchildren (relax, my puppies) and she insisted we make chocolate covered blueberries while waiting for my father to finish up work before we headed to dinner. Knowing how quickly these are made, I obliged and we went blueberry searching. We went out and bought the freshest blueberries at a nearby farmers market. They were so flavorful, sweet, crisp, and juicy that your teeth  just sank right into them. They were the perfect candidate for chocolate-drenching! I busted out 2 huge bars of Scharffen Berger chocolate and although pricey, Scharfeen Berger is of super quality. This chocolate covering technique can be used with any type of fruit, however, I suggest using a fruit that doesnt have mushy tendencies. I think raspberries would be too mushy, however blackberries are a great idea!
Wallah!---in 10 minutes we had ourselves the perfect end to a great evening....chocolate covered bliss.

Ingredients:
1 package of fresh blueberries (washed and dried)
Semi-Sweet Chocolate (depending on how much you want to make; plan accordingly) *you can use dark chocolate or even white chocolate-whatever your preference*

Line cookie sheets with wax paper. Tape down the wax paper to the sides of the cookie sheets to prevent from moving. Melt chocolate in double boiler or in a heat proof bowl over simmering water. If you choose to use the microwave, heat in intervals of 25 seconds to prevent from burning. 

Using a teaspoon, drop 1 dollop of melted chocolate onto the cookie sheet (about double the size of a quarter). Drop 3-4 blueberries into the chocolate then re-dip your spoon into the bowl of melted chocolate and slowly cover the blueberries until fully blanketed.

Put cookie sheets in fridge and let harden. Pack in tupperware with layers of wax paper in between. Enjoy :)


Tuesday, May 6, 2008

PEANUT BUTTER TORTE

TUESDAY'S WITH DORIE: 
PEANUT BUTTER TORTE
I finally purchased the long awaited book, "Baking, From My Home To Yours", by one of my favorites, Dorie Greenspan. Laurie of Quirky Cupcake hosts the group "Tuesdays With Dorie" in which its members bake one recipe a week from her aforementioned book. A chosen member selects what recipe is to be baked each week and on Tuesday of that week, everyone posts. The point of this group is to essentially bake your way through the book while having the support of about 100 other members through the use of forums. This helps with various suggestions, recommendations, substitutions, etc. As if my life isn't hectic enough raising two 10 week old puppies, managing my social life, keeping up with inconsistent hideous NY Mets baseball, and being 3 weeks behind on TiVo; I felt the need to join this group. Sure, why not?
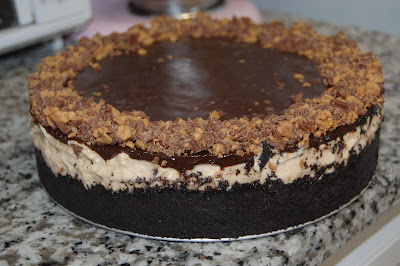
Dorie's Peanut Butter Torte was my first challenge. Let me just say, this torte is fantastic.  The bottom is made up of an Oreo crust using the entire Oreo, as opposed to just the cookie, less the cream.  From here on out I will only make Oreo crusts using the entire cookie--the cream acts as a great binding agent with the butter.  The filling consists of peanut butter, mini chocolate chips, chopped up peanuts, various spices (think nutmeg, et al) and heavy cream to create this amazing light peanut butter mousse that sets beautifully. It is topped off with bittersweet chocolate ganache and I added chopped Reese's around the perimeter for an extra kick. 
I'm excited to see what next weeks recipe is. My goal is to eventually bake everything in this book and 'Tuesday's With Dorie' makes it all the more enticing ;)


DIRECTIONS:
1 ¼ c. finely chopped salted peanuts 
2 teaspoons sugar
½ teaspoon instant espresso powder (or finely ground instant coffee)
¼ teaspoon ground cinnamon
Pinch of freshly grated nutmeg
½ c. mini chocolate chips (or finely chopped semi sweet chocolate)
24 Oreo cookies, finely crumbed or ground in a food processor or blender
*Whenever a crust is required for any recipe I make, I always make more than the recipe calls for. In this case, I crushed up an entire box of Oreos and really packed in the crust to come up high around the edges*
½ stick (4 tablespoons) unsalted butter, melted and cooled
Small pinch of salt
2 ½ c. heavy cream
1 ¼ c confectioners’ sugar, sifted
12 ounces cream cheese, at room temperature
1 ½ c salted peanut butter – crunchy or smooth (not natural)
2 tablespoons whole milk
4 ounces bittersweet chocolate finely chopped
Chopped up Reese's Peanut Butter Cups (optional)-*this is what I used on top*

Getting ready: center a rack in the oven and preheat the oven to 350°F. Butter a 9-inch Springform pan and place it on a baking sheet lined with parchment or a silicone mat.

Toss ½ cup of the chopped peanuts, the sugar, espresso powder, cinnamon, nutmeg and chocolate chops together in a small bowl. Set aside.

Put the Oreo crumbs, melted butter and salt in another small bowl and stir with a fork just until crumbs are moistened. Press the crumbs evenly over the bottom and up the sides of the spring formpan (they should go up about 2 inches on the sides). Freeze the crust for 10 minutes.

Bake the crust for 10 minutes, then transfer it to a rack and let it cool completely before filling.


Working with a stand mixer fitted with the whisk attachment or with a hand mixer in a large bowl, whip 2 cups of the cream until it holds medium peaks. Beat in ¼ cup of the confectioners’ sugar and whip until the cream holds medium-firm peaks. Scrape the cream into a bowl and refrigerate until needed.

Wipe out (no need to wash) the bowl, fit the stand mixer with the paddle attachment if you have one, or continue with the hand mixer, and beat the cream cheese with the remaining 1 cup confectioners’ sugar on medium speed until the cream cheese is satiny smooth. Beat in the peanut butter, ¼ cup of the chopped peanuts and the milk.

Using a large rubber spatula, gently stir in about one quarter of the whipped cream, just to lighten the mousse. Still working with the spatula, stir in the crunchy peanut mixture, then gingerly fold in the remaining whipped cream.


Scrape the mouse into the crust, mounding and smoothing the top. Refrigerate for at least 4 hours, or overnight; cover with plastic wrap as soon as the mousse firms.

To Finish The Torte: put the chopped chocolate in a heatproof bowl and set the bowl over a saucepan of simmering water. Leave the bowl over the water just until the chocolate softens and starts to melt, about 3 minutes; remove the bowl from the saucepan.

Bring the remaining ½ cup cream to a full boil. Pour the cream over the chocolate and , working with a a rubber spatula, very gently stir together until the ganache is completely blended and glossy.

Pour the ganache over the torte, smoothing it with a metal icing spatula. Scatter the remaining ½ cup peanuts over the top and chill to set the topping, about 20 minutes.

When the ganache is firm, remove the sides of the Springform pan; it’s easiest to warm the pan with a hairdryer, and then remove the sides, but you can also wrap a kitchen towel damped with hot water around the pan and leave it there for 10 seconds.

Refrigerate until ready to serve.

Monday, May 5, 2008

CORNBREAD MINI MUFFINS

CORNBREAD MINIS
Aren't these just so cute? I love everything and anything miniaturized. Mini chips. Mini muffins. Mini bagels. Mini quiches. Mini tarts. Mini Schnauzers. OK, you get the point. Perhaps because I'm so mini (all of 4'11) I appreciate mini edibles. Even my best friend calls me mini.  

Since I didn't make anything corn related for my Cinco de Mayo party, I decided to implement some mini cornbread muffins to the menu. I originally planned to make a corn salsa-type side dish but that fell through so these were the perfect solution.  I personally love sweet, moist, cake-like cornbread so I resorted to the ever so handy allrecipes website and found a recipe, based on the rave reviews, found here. Before scooping the batter into my mini muffin pan, I let the mixed batter sit for about 3-4 minutes, then remixed and put in the pans. This technique allows for maximum crowning on the muffins. These are bite sized delectables and make for a great cute little side dish, enjoy!

CHOCOLATE MASCARPONE BROWNIE DISASTER

CAPITAL D FOR DISASTER
Holy Shnikes! Alert the media. I'm so over Mascarpone cheese. I'm so very done with it. Kaput. Finito. I can't quite put my finger on it, but there is something so off about this cheese. It's similar looking to cream cheese but I find it to be completely tasteless. Perhaps it was the brand of Mascarpone that I bought, but I'm just really not a fan.  I'm having a big Cinco de Mayo party tonight at my apartment, (pictures/recipes to follow) and I spent the entire weekend cooking and baking. I noticed that I had Mascarpone cheese in the fridge that was going to expire soon so I thought I would make something different and bake Mascarpone Brownies (pictured above). Instead of using a typical brownie pan, (which the recipe called for) I decided to get creative and bake it in a 9 inch glass pie plate adding my own chocolate graham cracker crust to the recipe and topping it off with chocolate ganache. Seemed like a pretty good idea, don't ya think? Graham cracker crust, brownie middle, topped off with smooth chocolate ganache--what could possibly go wrong!? 
Anyway, I realized I used my only glass pie plate for the brownies and desperately needed it to make my Mexican 7 layer dip. I decided to take the brownies out of the pie plate, slice them up pretty, and serve them that way. THANK GOD I decided to do this before my guests arrived. The brownies were completely stuck to the pie plate and they were so dense and heavy, my metal knife actually bent while trying to lift them out of the pan! I even tried a little piece thinking that I would do my very best to salvage these treats, but they were horrible tasting and garbage-bound. I thought I'd share my one of many failures with you folks...